Enabling SSL Encryption for the Web Client
The C•CURE 9000 Web Client supports SSL-based encryption for communications between the Web Client browser system and the Web Server you are using to communicate to the C•CURE 9000 Server.
The Web Client SSL Encryption option provides RSA Encryption Scheme – Optimal Asymmetric Encryption Padding (RS-AES-OAEP) using 1024-bit key size, to encrypt the AES (128-bit key size) key for session communications between the Web Client browser and the C•CURE 9000 Server.
You do not need to enable SSL Encryption unless your site requires additional security for all client connections.
To use the SSL option, you must set up SSL certificates on your IIS Web Server.
You may need to ask for assistance from your IT Administrator to perform SSL installation and configuration, depending upon your expertise with SSL and IIS and the level of access to security and networking at your site.
About Certificates and Trusted Sites
If you decide that you need to use SSL Encryption, Software House has provided certificates that you can use to implement SSL. These certificates provide a secure connection, but they may generate warnings from your browser because they are generic certificates that are not matched to your web server's network or domain address.
If you use the Software House certificates, it is likely that Web Client users may see messages in their browsers warning about:
Certificate mismatch: Because Software House cannot know in advance what your Web Server name is, the Software House Certificate cannot match the URL your web server uses for the Web Client. For this reason, Web Client users may get a message such as "Server's certificate does not match the URL."
Trusted Certificate Authority: The Software House Certificate is not issued by a Trusted Certificate Authority recognized by Internet Explorer and other Web browsers. For this reason, Web Client users may get a message such as "The security certificate presented by this website was not issued by a trusted certificate authority."
Your users can safely display the Web Client by choosing to "continue to this website". The exact message may vary from browser to browser.
However if these messages pose a risk or a nuisance at your particular site, you can:
|
■
|
Configure a self-signed Certificate
see the instructions at : http://technet.microsoft.com/en-us/library/cc757327(WS.10).aspx |
|
■
|
Purchase an SSL Certificate from a trusted Certificate Authority such as VeriSign.com or Entrust.net. |
Setting Up SSL Encryption
Perform the following steps to set up SSL Encryption for your IIS Server.
To Enable SSL Encryption for the Web Client
|
1.
|
Locate the Software House certificates on the C•CURE 9000 DVD in the root-level Certificates folder.
You will be importing the following two Software House certificates into IIS: |
|
■
|
SoftwareHouse_CA.cer (Software House Certificate Authority) |
|
■
|
SWH_WebCert.pfx (Software House Personal Information Exchange certificate) |
Importing the SSL Certificates into Your IIS Web Server
To import Software House certificate files, use the Microsoft Management Console for the IIS Server Machine and log in as an administrator.
Complete the following procedure for each Certificate.
To Import the Certificate Authority Certificate
|
1.
|
Log on to the IIS Web Server system as an administrator. |
|
2.
|
Select Start>Run and type mmc, then click OK. The Microsoft Management Console appears. |
|
3.
|
Select File>Add/Remove Snap-in. The Add/Remove Snap-in dialog box appears. |
|
4.
|
Select Certificates and click Add. |
|
5.
|
Select Computer account, then click Next. |
|
6.
|
Select Local computer and click Finish. |
|
7.
|
Click OK to close the Add Standalone Snap-in dialog box. Certificates (Local Computer) appears on the list of selected snap-ins for the new console. |
|
8.
|
To save the changes to the Microsoft Management Console, select File>Save. Click Save in the Save As dialog box. |
|
9.
|
Click  for Certificates (local Computer), then right-click on the Trusted Root Certificate Authorities folder and select All Tasks>Import. for Certificates (local Computer), then right-click on the Trusted Root Certificate Authorities folder and select All Tasks>Import. |

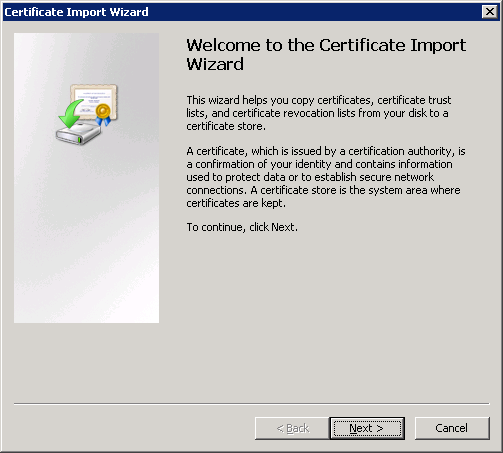
The Certificate Import Wizard appears.
|
10.
|
Click Next. The File to Import screen appears. |

|
11.
|
Click Browse to navigate to the Certificates folder on the C•CURE 9000 Installation DVD. |
|
12.
|
Select SoftwareHouse_CA.cer and click Open to choose the .cer file, then click Next.
The Certificate Store screen appears in the Certificate Import wizard. |
|
13.
|
Click Next to accept the default location (Place all certificates in the following store). The Completing the Certificate Import Wizard screen appears. |
|
14.
|
Click Finish to complete the import process. |
|
15.
|
A message box appears stating "The import was successful." Click OK. |
To Import the Personal Information Exchange Certificate
|
1.
|
From the Microsoft Management Console, right-click on the Personal folder, located under Certificates (Local Computer and select All Tasks>Import. |
|
2.
|
Click Next, then click Browse to navigate to the Certificates folder on the C•CURE 9000 Installation DVD. |
|
3.
|
Choose All Files ("*") from the Files of type drop-down list. |
|
4.
|
Select SWH_WebCert.pfx and click Open to choose the file, click Next.
The Certificate Store screen appears in the Certificate Import wizard. |
|
5.
|
Click Next to accept the default location (Place all certificates in the following store). The Completing the Certificate Import Wizard screen appears. |
|
NOTE
|
If you are prompted with a password field, depending on the type of certificate that was imported, enter the password SWHdev and select Next.
Otherwise, contact your IT administrator for the password. Some certificates may require a password for extra security.
|
|
6.
|
Click Finish to complete the import process. |
|
7.
|
A message box appears stating "The import was successful." Click OK. |
|
8.
|
Choose File>Save to save your changes, then File>Exit to close the Microsoft Management Console. |
Enabling SSL on Your IIS 7.0 Web Server
After you have imported the SSL certificates into your IIS Web Server, configure the IIS Web Server to use the SWH_WebCert.pfx (Software House certificate) for communications.
To Enable SSL on your IIS 7.0 Web Server
|
1.
|
Click on Start>Administrative Tools>Internet Information Services (IIS) Manager. |
|
2.
|
Click on the server name (the system name of your IIS server) for the Web Client. |
|
3.
|
Click to expand the Sites folder. |
|
4.
|
Select Default Web Site. |

|
5.
|
From the Actions menu on the right, click Bindings. The Site Binding dialog box appears. |
|
6.
|
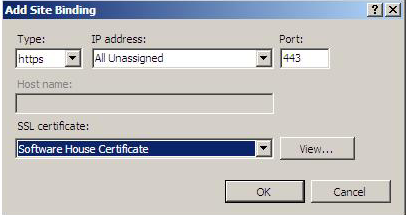
Click Add to open the Add Site Binding dialog box. |
|
7.
|
Choose https from the Type drop-down list. |
When you choose https, the SSL certificate field appears. Select Software House Certificate.
|
8.
|
Choose All Unassigned from the IP Address drop-down list. |
|
9.
|
Typically, you can accept the default Port (443), but if the default port is listed as 80, you should change it to another port number to avoid conflicts (Port 80 is the default port that a Web server uses to listen to all Web clients; use a separate port for the C•CURE 9000 Web Client). |
|
11.
|
Click Close on the Site Bindings dialog box. |
The IIS server is now ready to communicate over an SSL channel, using the certificate you specified.
To access the C•CURE 9000 Web Client, use a secure Web site URL (such as https://<machinename>/CCure9000WebClient/WebStar.html) once the SSL Encryption option is enabled.